Overleaf cannot export to Google Docs™, so to move an Overleaf project into Docs you download its source as a .zip and import the .tex from it. LaTeXFlow Import writes the headings, lists, tables and equations into the document; the .bib file and the figures from the same .zip go in with two short steps of their own.
A single short .tex file is covered in You Received a .tex File, part by part. This post is about what a real Overleaf project adds: chapters split into several files, a separate refs.bib, and a folder of figures.
1. Download the project from Overleaf
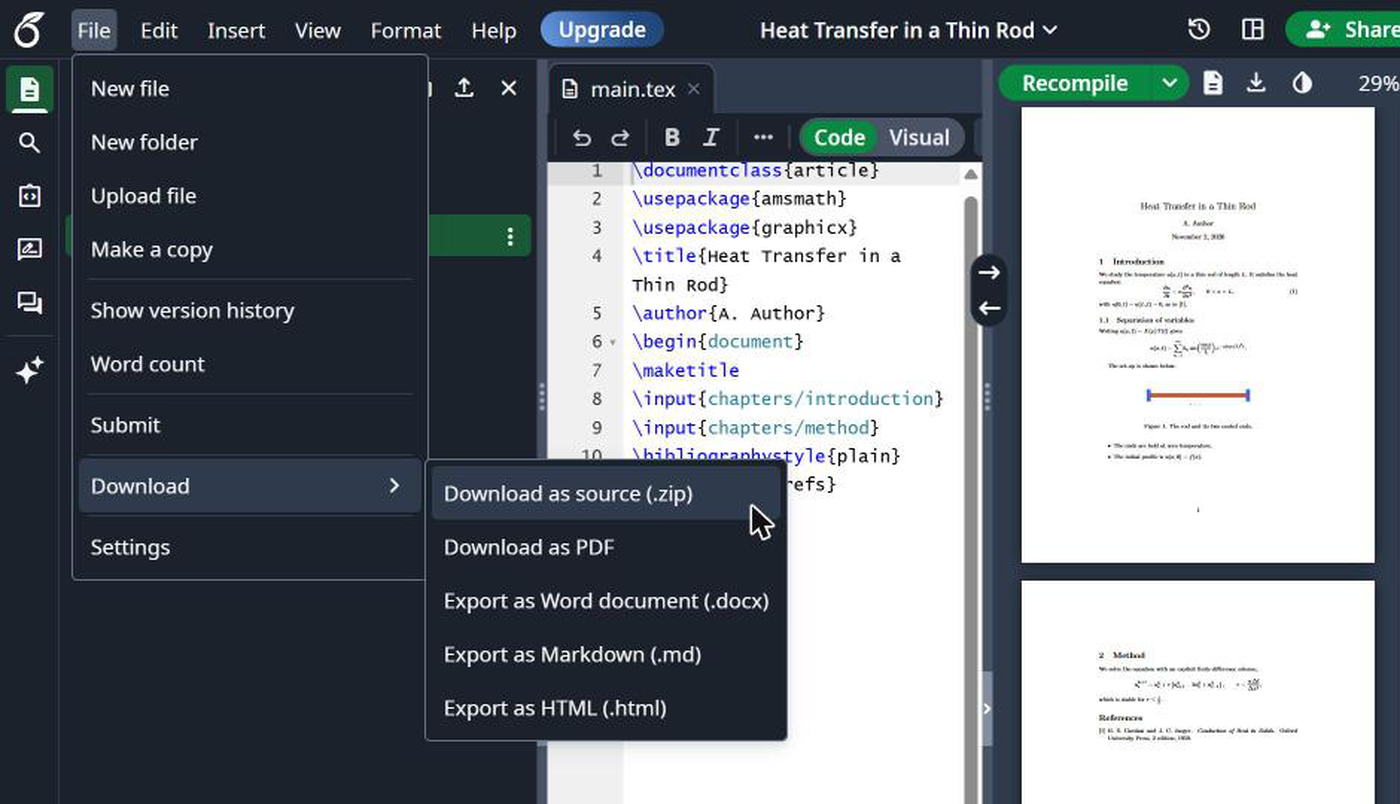
- Open the project in Overleaf.
- Choose File in the upper left of the editor, then Download as source (.zip). From the project list, the Download .zip file button does the same.
- Unzip the file on your computer.
A typical thesis or paper project unzips into something like this:
1
2
3
4
5
6
main.tex
chapters/introduction.tex
chapters/method.tex
refs.bib
figures/setup.png
figures/results.pdf
main.tex holds the preamble and pulls the chapters in with \input{chapters/introduction}. That line matters for the next step.
2. Import the .tex files, in order
Import reads one .tex file at a time and does not follow \input or \include. A chapter file without \documentclass or \begin{document} is fine: Import reads it as body text.
- Open an empty Google Docs™ document.
- Open LaTeXFlow (Extensions → LatexFlow → Open Equation Panel) and go to the Export / Import tab.
- Press Choose .tex file and pick
main.tex. The sidebar lists what it read and what will change on the way in. Nothing is written yet. - Press Import.
- Pick the next file,
chapters/introduction.tex. Import writes at the end of the tab shown after Import into:, and since the tab now has content, tick Append anyway, then press Import. - Repeat for each chapter in the order
main.texlists them.
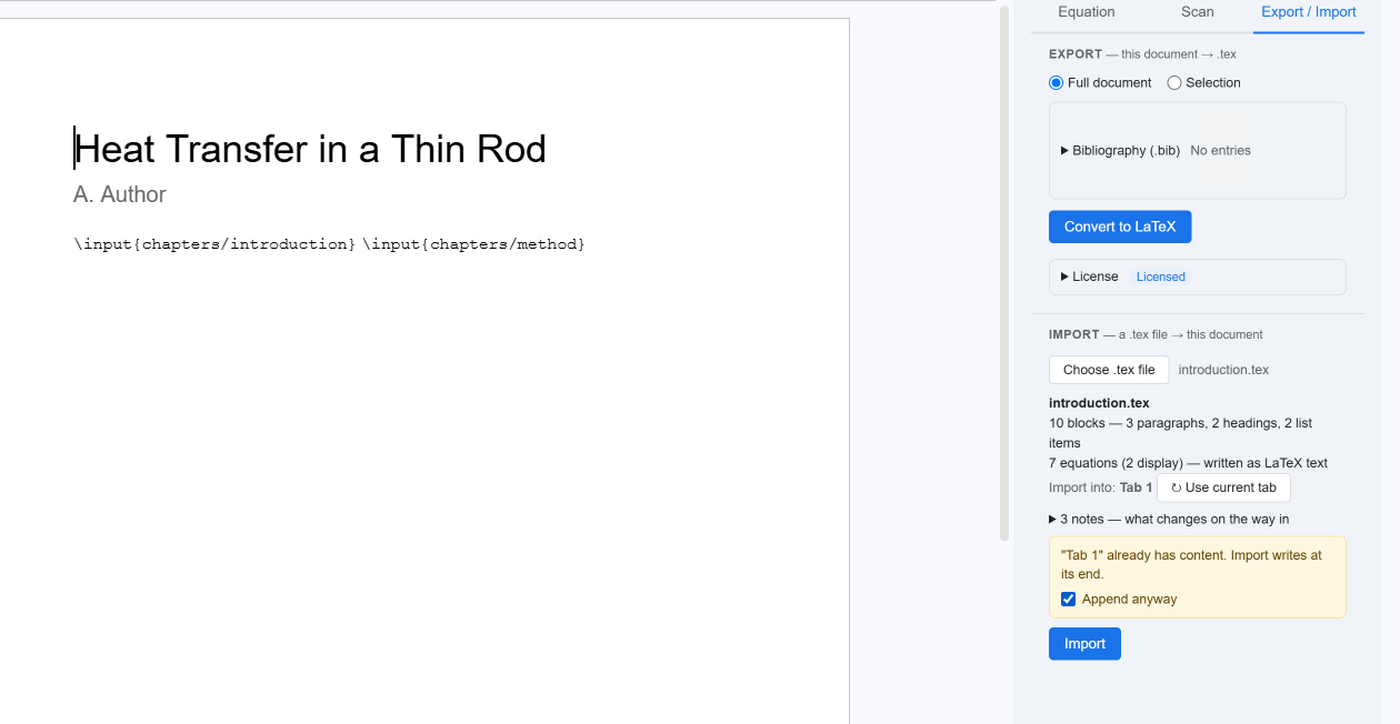
\section and \subsection become Docs headings, lists become Docs lists and tabular becomes a Docs table. Equations arrive as LaTeX text between delimiters, so you can still edit them as source. The sidebar shows how far it has got as a percentage; a file of about 1,000 blocks took about a minute in our tests. If Google Docs™ stops part-way, Continue import carries on from the block where it stopped.
If you would rather keep each chapter apart, add a document tab for each one and import it there instead of appending.
3. Paste refs.bib into the Bibliography
A separate refs.bib is not inside any .tex file, so Import cannot read it. When main.tex has \bibliography{refs}, the pick summary says so in a note and points to where the entries go. The citations still come in: each \cite{key} is written as a [@key] marker.
- Open
refs.bibfrom the unzipped folder in any text editor and copy all of it. - On the Export / Import tab, open Bibliography (.bib), paste the entries and press Save.
The entries now belong to the document. When it is exported back to LaTeX, every [@key] becomes \cite{key} again and the entries go back into the .tex, so leave the markers as they are while you edit.
If the project keeps its .bib inside main.tex in a filecontents block, Import saves it to the Bibliography by itself and there is nothing to paste.
4. Put the figures back
A .tex file names its figures but does not contain them. Where \includegraphics{figures/setup.png} was, the document has a bold line:
1
[Image: setup.png — insert here]
- Click on that line.
- In Docs, choose Insert → Image → Upload from computer and pick the file from the
figuresfolder of the.zip. - Delete the placeholder line.
Searching the document for [Image: finds every placeholder. A figure saved only as PDF needs to be converted to PNG or JPG first, since Docs does not insert PDF files as images.
5. Make the equations visible
Until now the maths is LaTeX text, which is what you want while the wording is still changing. When readers need to see rendered maths, open the Scan tab, press Scan Document, then Convert All. Each equation becomes an image and keeps its LaTeX, and Revert to LaTeX turns the images you select back into source; Revert all does the whole tab after asking.
Scan, Convert All and Revert are free. Import and Export are the paid part of LaTeXFlow.
6. FAQ
Can I export from Overleaf to Google Docs™? Not directly: Overleaf has no Google Docs™ export. Download the source as a .zip and import the .tex into Docs with an add-on (sections 1 and 2).
Is there a free way? Yes, for the text and maths only: paste the body of each .tex into Docs and convert the equations with the free Scan. Headings, lists, tables and citations are then redone by hand. How to get a LaTeX file into Google Docs™ walks that path.
Will the project still compile in Overleaf after editing in Docs? Export writes the document back as a .tex with its bibliography, ready to open in Overleaf. What changes in a round trip is listed in Docs → .tex → Docs.
Overleaf or Google Docs™? Both, for different people. Writing and compiling stay in Overleaf; co-authors who do not use LaTeX can comment and suggest edits in Docs. Import and Export move the text between them.
7. Summary
- Overleaf: File → Download as source (.zip), then unzip.
- Docs: LaTeXFlow Export / Import tab, import
main.tex, then each chapter with Append anyway. - Paste
refs.bibinto Bibliography (.bib). - Replace each
[Image: …]line with the figure from the.zip. - Scan → Convert All when the maths should be rendered.
- License keys: LaTeXFlow store
- Activation, cancelling and refunds: Export & Import guide